


-

Unfinished Wood Lid for Laconic Jar per each
$1.49Give your candles a warm, natural finishing touch with our Unfinished Pine Wood Candle Jar Lids. Crafted in the USA from locally sourced pine, these beautiful wood lids add an instant upscale,... -


Small Diamond Black Metal Lids per each
$1.69These gorgeous Diamond Black Metal Lids will be that perfect touch for your candles! This lid has a matte black finish with a unique diamondesque pattern!Lids are sold per each (individually). Fits... -

 SALESALE
10 oz. Laconic Clear Vessels
$9.99 - $550.00Retail Price $17.49 - $1,100.00Discover the elegance of our 10 oz. Laconic Clear Vessels, perfect for creating stunning candles that elevate any space. These versatile vessels are designed to showcase your creativity while... -

First Snow Fragrance Oil
$5.99 - $410.99Crisp, clean and cool, just like a blanket of newly fallen snow. Also known as Caribbean Cool. Phthalate Free: YesFlashpoint: >200°F (Yes Candle Gel)Vanillin: 0% IFRA Quick Reference:1.83%-Deodorant... -

Mistletoe Magic Fragrance Oil
$5.49 - $332.50That magical feeling sparked after a romantic kiss under the mistletoe is created with pink champagne, sparkling quince, sugared strawberries and a caramelized vanilla amber.Top Note: Pink Champagne,... -

Sparkling Snowflakes (BBW type) Fragrance Oil
$4.49 - $295.99Retail Price $5.99 - $410.99Crisp, clean, cool and slightly minty.Top Notes: EucalyptusMiddle Notes: MintBottom Notes: Tonka Phthalate Free: YesFlashpoint: 192°F (Yes Candle Gel)Vanillin: 0% IFRA Quick Reference:1.27%-Deodorant...
Description
DIY Snowman Candles
A Fun & Easy Winter Candle Decorating Project!
Winter can be so blah, but what better way to make it fun than with adorable snowman candles!
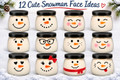
These cute little snowman faces are incredibly easy to paint onto our Laconic Vessels. The rounded shape of these jars makes them perfect for creating cheerful snowman heads!
Whether you're making holiday gifts, decorating your home, or just looking for a fun winter craft, these snowman candles are sure to bring a smile to everyone's face. Best of all, you can decorate a candle you've already made or start with an empty vessel and pour your candle later!
Skill Level: Easy
Project Time: 10 minutes (plus drying time)
Makes: As many as you want!
Ingredients
None! Just a premade candle or an empty Laconic Vessel that you can fill with wax later.
Supplies & Equipment Needed
- Black and orange Sharpie paint markers or glass paint
- Laconic Vessel
- Small Black Metal Lid (optional, but it makes an adorable snowman hat!)
- Sparkling Snowflakes Fragrance Oil or another fun winter fragrance
Step-by-Step Instructions
Step 1: Gather Your Supplies
Start with a clean, dry Laconic Vessel or a candle you've already made. Grab your black and orange paint markers or glass paint, and you're ready to go!
Step 2: Get Creative!
Think about what kind of personality you want your snowman to have. A big, happy smile? A cute little grin? A traditional coal-dot mouth?
Every snowman can have its own personality, so have fun with it!
Step 3: Paint Your Snowman's Face
Start by painting two black dots for the eyes.
Next, use orange paint to create a cute carrot-shaped nose.
Finish with a big smile using black paint. You can make a curved line or use little dots to create a traditional coal smile.
Tip: Paint the eyes first, then the nose, and finish with the mouth to avoid accidentally smearing your design as you work.
Step 4: Oops! Made a Mistake?
No worries! If you don't love your snowman's expression, simply wipe off the paint right away with a little glass cleaner and start again.
That's part of the fun! Just make sure the glass is clean and dry before repainting.
Step 5: Let Your Snowman Dry
Once you're happy with your snowman's face, set the vessel aside and allow the paint to dry completely.
Depending on the type of paint and how thickly it's applied, drying may take a few hours or even a full day. Follow the paint manufacturer's instructions.
Step 6: Finish Your Snowman Candle!
You're all done!
If you decorated a premade candle, it's ready to enjoy once the paint has fully dried.
If you started with an empty Laconic Vessel, you can now make your favorite candle inside!
For an extra cute finishing touch, add a Small Black Metal Lid. It looks just like a little snowman hat!
Helpful Tips
- Use paint markers or glass paint suitable for glass surfaces.
- Keep all paint on the outside of the vessel, away from the wick, wax, and flame.
- If pouring a candle after decorating, allow the paint to cure completely and follow your normal candle-making and testing procedures.
- Try making a whole family of snowmen with different expressions!
- Fill your snowman candles with your favorite winter fragrances for an extra cozy touch.
Show Us Your Snowmen!
We can't wait to see what you create!
These adorable snowman candles make wonderful handmade gifts, winter decorations, and fun projects for the whole family.
Tag Candles & Supplies on social media and show off your snowman creations. We love seeing what our creative customers come up with!
Happy Candle Making!
Your Friends at Candles & Supplies
www.CandlesandSupplies.com
